
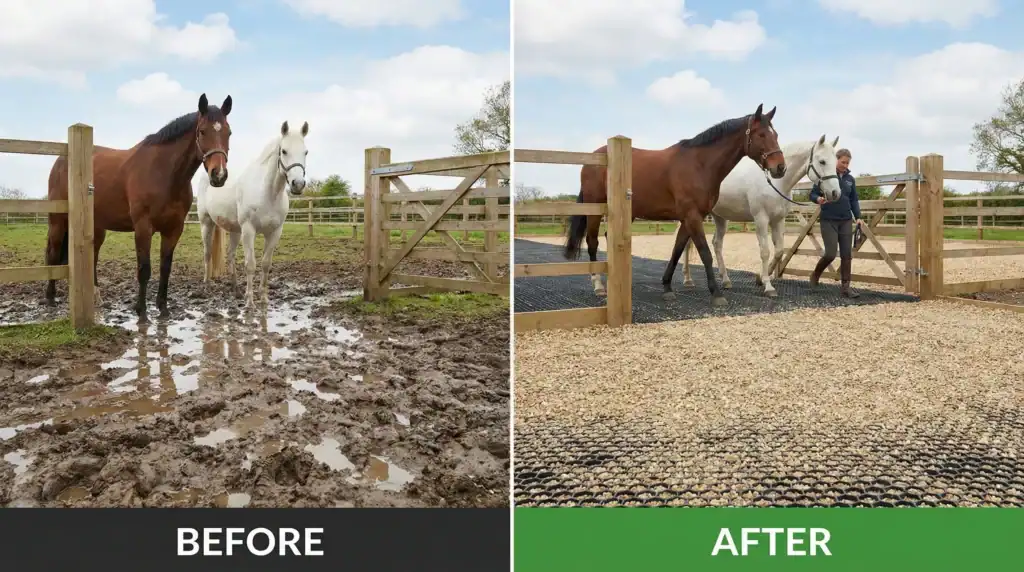
Horse Paddock Grid: Stop Mud Before It Destroys Your Paddock
If you own horses, you probably know how expensive it can be to keep a paddock healthy. Vet bills forthrush, white line disease, and hoof abscesses add up, and every year you buy more gravel that just sinks into the mud. A paddock grid can help you avoid these costs with a single installation.
Mud is not just ugly; it is expensive. It causes thrush, white line disease, hoof abscesses, and more vet bills. You spend hours cleaning your horse’s legs, and every spring you add more gravel that disappears by fall.
There is a solution. A horse paddock grid, sometimes referred to as an equestrian ground grid, paddock stabilization mat, or mud control grid, creates a stable surface that drains well and remains firm even in wet weather.
Install it once and enjoy dry ground for years, healthier hooves, and less maintenance.
This guide covers what a paddock grid is, where to place it, and how to get started. It is written by people who understand how much your horse’s comfort matters.

The Real Cost of Mud in Horse Paddocks
Mud may seem like something you just have to live with, but that is not true. If you ignore it, you often spend more money than if you fix it.
| Problem | What Happens | Real Cost |
| Hoof disease | Thrush, white line, hoof rot from constant moisture | $200-500 per vet visit |
| Injury risk | Slipping, twisting on uneven muddy ground | Potentially catastrophic |
| Horse stress | Reluctance to move, behavioral issues, less turnout time | Training setbacks |
| Daily labor | Scrubbing legs, cleaning hooves, hauling muck | Hours per week |
| Annual repairs | Dumping gravel that sinks, re-grading | $500-1,500/year |
In five years, you could spend thousands of dollars on short-term fixes and vet bills, but still have mud problems.
The good news is that you can solve mud problems. You just need the right solution.
How Paddock Grid Solves the Mud Problem
The grid is made of strong HDPE plastic in a honeycomb shape. You lay it on prepared ground and fill the cells with gravel or sand to create a surface that:
- Distributes weight: Hoof pressure spreads across the grid instead of being concentrated in one area, pressing into the soil.
- Locks fill material in place: Gravel stays put and does not sink into the mud.
- Drains instantly: Water moves through the open cells and into the ground below
- Protects the surface: Soil remains separate from the walking area
Your horse walks on the gravel, not on the plastic. The grid remains out of sight beneath the surface, keeping the ground stable.
What you get:
- Dry footing in any weather
- Hooves that stay healthy
- A paddock you can actually use year-round.
Where to Install Paddock Grid First
You do not have to cover the entire paddock. Mud usually forms where horses gather, and that is where the grid works best. Ask yourself, ‘Where is the mud worst right now?’ Start with those spots for the best results.
| Zone | Why It Gets Muddy | Priority |
| Gate areas | Horses congregate, pace, wait for turnout | ⭐⭐⭐⭐⭐ |
| Water trough surrounds | Multiple visits daily, standing while drinking | ⭐⭐⭐⭐⭐ |
| Feeding stations | Standing, pawing, waiting for food | ⭐⭐⭐⭐ |
| Shelter entrances | Traffic in and out of run-in sheds | ⭐⭐⭐⭐ |
| High-use pathways | Habitual walking routes | ⭐⭐⭐ |
| Full paddock | Complete coverage | ⭐⭐ (when budget allows) |
Start at the gate, since it is often the muddiest and smallest area. Install 12 to 20 square meters of grid there, and you will see a difference right away. You can add more later if needed.
Product Specs for Equestrian Use
We offer two sizes suited for paddock applications:
ARW-GG33 — Ideal for Paddocks
| Spec | Value |
| Size | 333 × 333 × 50 mm (13″ × 13″ × 2″) |
| Coverage | 0.11 m² per panel |
| Weight | 0.6 kg per panel |
| Load Capacity (filled) | 250+ t/m² |
Why it works for paddocks:
- 50mm depth holds enough gravel for stable footing
- Compact size fits around posts, troughs, and awkward corners
- Light enough for one person to carry and install
- With a 250 t/m² capacity, it easily handles any horse’s hoof pressure
ARW-GG50 — For Heavy Use Areas
| Spec | Value |
| Size | 500 × 500 × 50 mm (19.7″ × 19.7″ × 2″) |
| Coverage | 0.25 m² per panel |
| Weight | 2.0 kg per panel |
| Load Capacity (filled) | 500+ t/m² |
This model is best for areas where tractors, trucks, or trailers also travel. The larger panels help cover ground more quickly on big projects.
Quick Comparison
| Model | Size | Weight | Load Capacity | Best For |
| ARW-GG33 | 333×333×50mm | 0.6 kg | 250+ t/m² | Paddocks, gates, shelters, DIY install |
| ARW-GG50 | 500×500×50mm | 2.0 kg | 500+ t/m² | Arenas, driveways, vehicle access areas |
All models use HDPE material, work in temperatures from -40°C to +120°C, have interlocking safety-lock connections, and are UV stabilized and ammonia resistant.
Why Paddock Grid Beats Traditional Solutions
You may have tried other solutions. Here is why they often fail and why the grid works.
The Problem with Crushed Stone Alone
Gravel is the usual solution. You dump a load, spread it out, and hope the problem is solved. But it usually is not.
| Problem | What Happens | Result |
| Stone sinks | Hooves push gravel into soft soil | Need to add more every year |
| Surface becomes uneven | Gravel migrates to low spots | Puddles form, injury risk |
| Mud rises | Rain brings soil up through stone | Brown soup returns by autumn |
| Compaction | Fine particles fill gaps | Drainage decreases each year |
For example, you might use 2 to 3 tonnes of gravel for every 100 square meters each year, costing $50 to $80 per tonne delivered. Over 10 years, that adds up to $1,000 to $2,400, and you may still have mud. If you use a paddock mud control grid from the start, you make the ground more stable and save money and effort in the long run.
How grid fixes it: The grid locks gravel in place. Geotextile beneath blocks mud from rising. Stone stays where you put it. Drainage stays permanent.
The Problem Rubber mats work well inside stalls, but they do not hold up outside. outside, it fails.
| Problem | Why It Happens |
| Edges curl up | UV exposure, ground movement |
| Slippery when wet | Smooth surface + rain = skating rink |
| Water pools on top | Mats don’t drain |
| Seams separate | Expansion/contraction pulls joints apart |
| Degrades in sun | UV breaks down rubber in 5-8 years |
The grid’s advantage is that it is fully permeable, has a textured gravel surface, strong interlocking connections, and UV-stabilized plastic rated for over 25 years.
The Problem with Concrete
Concrete may seem like a permanent solution, but horses tend to dislike it.
| Problem | Consequence |
| Too hard | Joint stress, concussion injuries over time |
| Slippery | Needs texturing or rubber overlay |
| No drainage | Must slope perfectly, add drains |
| Cracks | Freeze-thaw cycles break it apart |
| Expensive | $80-150/m² installed |
The grid’s advantage is that the fill material provides cushion, allows natural drainage, costs about one-third as much as concrete, and is comfortable for hooves.
10-Year Total Cost Comparison
| Solution | Year 1 Cost (100 m²) | Annual Maintenance | 10-Year Total | Condition at Year 10 |
| Paddock Grid + Gravel | $2,500-3,500 | $0-100 | $2,500-4,500 | Still working perfectly |
| Crushed stone only | $800-1,200 | $400-600 | $4,800-7,200 | Mud returns annually |
| Rubber mats | $3,000-5,000 | $200-400 | $5,000-9,000 | Needs full replacement |
| Concrete | $8,000-15,000 | $100-300 | $9,000-18,000 | Cracking, slippery |
In summary, the grid costs more upfront than stone alone, but less than rubber or concrete. Over 10 years, it is the most affordable option and the only one that still works well.
Calculate Your Area & Plan Your Budget
Quick Area Calculator
| Zone | Typical Size | Panels Needed (GG33) | Install Time |
| Gate area (single) | 3m × 4m = 12 m² | ~110 panels | 1-2 hours |
| Gate area (wide) | 4m × 6m = 24 m² | ~220 panels | 2-3 hours |
| Water trough surround | 3m × 3m = 9 m² | ~82 panels | 1 hour |
| Feeding station | 3m × 5m = 15 m² | ~136 panels | 1-2 hours |
| Run-in shelter entrance | 4m × 4m = 16 m² | ~145 panels | 1-2 hours |
| Small paddock (full) | 20m × 30m = 600 m² | ~5,450 panels | 2-3 days |
Formula: Area (m²) ÷ 0.11 = number of GG33 panels needed
Budget Estimate Template
| Item | Estimate | Your Quantity | Your Cost |
| Paddock Grid (GG33) | Contact for pricing | ___ m² | $___ |
| Angular gravel 4-10mm | $50-80/tonne | ___ tonnes | $___ |
| Geotextile fabric | $2-4/m² | ___ m² | $___ |
| Delivery | Varies by location | — | $___ |
| Total Materials | — | — | $___ |
Gravel estimate: ~5-7 tonnes per 100 m² (for 50mm fill depth)
Start Small, Expand Later
You do not need to install everything at once. The grid pieces connect easily, allowing you to add more in stages as your budget permits.
Recommended sequence:
Each phase works by itself. You can add more whenever you are ready.
Installation Guide for Horse Paddocks
Tools & Materials
- Paddock grid panels
- Angular gravel or coarse sand (4-10mm)
- Geotextile fabric (recommended)
- Rubber mallet
- Shovel, rake, wheelbarrow
- String line and stakes (for straight edges)
- 1-2 helpers (optional but faster)
Step-by-Step Installation
| Action | Notes |
| Mark the area | Use stakes and string for clean edges |
| Excavate 100-150mm | Remove topsoil and soft mud |
| Level and compact | Hand tamper or plate compactor |
| Lay geotextile | Overlap edges 150mm, extend past grid area |
| Install grid panels | Start from one corner, interlock edges, tap with mallet |
| Fill with gravel/sand | Rake into cells, fill flush with grid top |
| Compact surface | Plate compactor or hand tamper |
| Top up fill | Add more gravel after compaction settles |
Installation Speed
- One person: 50-80 m² per day
- Two people: 100-150 m² per day
- Gate area (20 m²): Half a day including prep
The grid installation is fast. Base preparation takes the most time.
DIY or Hire a Contractor?
| Project Size | Recommendation |
| Gate area, water trough (under 30 m²) | DIY — straightforward weekend project |
| Multiple zones (50-100 m²) | DIY possible, contractor saves time |
| Full paddock or arena (200+ m²) | Consider contractor with equipment |
Infill Options for Equestrian Use
| Infill Type | Pros | Cons | Best For |
| Angular gravel 4-10mm | Locks in place, drains fast, stable | Firmer surface | Gates, high-traffic zones |
| Coarse sand | Softer feel, familiar to horses | Can compact, holds moisture | Turnout areas, arenas |
| Pea gravel | Smooth, drains well | Rolls underfoot, less stable | Light-use areas |
| Rubber chips | Cushioned, quiet | Expensive, can scatter | Arena base layers |
We recommend using angular gravel between 4 and 10 millimeters for most paddocks. It fits well in the grid, drains quickly, and gives horses a solid footing.
Maintenance: What to Expect
Daily & Weekly
| Task | Frequency | Effort |
| Pick up manure | Daily or every other day | Same as any paddock |
| Visual check of fill level | Weekly glance | 30 seconds |
Manure stays on top of the gravel, so you can rake or fork it as you normally would. The grid does not need special care, so you save time. Instead of spending thirty minutes hosing off mud, you can finish in five minutes and spend more time with your horses.
Seasonal
| Task | Frequency | Notes |
| Top up gravel | Once a year (if needed) | High-traffic spots may settle slightly |
| Check edges | Spring and autumn | Confirm edge restraints are secure |
| Rinse with hose | Summer (optional) | Flush urine residue if odor develops |
Long-Term
| Timeframe | Expectation |
| Year 1-5 | Virtually zero maintenance |
| Year 5-10 | Occasional gravel top-up in heavy-use spots |
| Year 10+ | Continues working—UV-stabilized HDPE doesn’t degrade |
If you use only stone, you need to add 2 to 3 tonnes every year. With the grid, you may only need to add a few buckets occasionally.
Common Questions
Typical Equestrian Applications
Besides controlling mud in paddocks, the same grid can be used for:
- Round pen bases: Provide a stable footing for lunging.
- Arena sub-base: Works under sand or synthetic footing
- Wash bay floors: Drains quickly with no standing water.
- Barn aisle entrances: Prevents mud from being tracked inside.
- Trailer parking: Supports vehicle weight and stays firm between paddocks. It also works well for all-weather walking routes.
- Sacrifice lot areas: Allows for controlled, heavy-use turnout
[

Get a Quote for Your Paddock Project
What we provide:
- Product specs and load ratings
- Quantity estimate based on your measurements
- Infill recommendations for your soil type
- Installation guidance document
What we need from you:
- Location (for shipping estimate)
- Area size (m² or dimensions)
- Current ground condition (clay, sand, existing gravel)
- Primary use (paddock, arena, driveway)
→ Request a Quote | → View Ground Grid Product Page
References
Hoof Health & Equine Care:
- American Association of Equine Practitioners (AAEP) — Hoof care guidelines and veterinary resources
Equine Facility Design:
- Penn State Extension – Horse Facilities — Paddock design, drainage, and footing resources
- University of Kentucky Equine Programs — Research on equine facility management
Product specifications current as of December 2025. AQUA RainWater supplies paddock grid products; installation by property owners or qualified contractors.
Your horses deserve dry ground, and so do you.